

Table of Contents
- What You'll Need Before Installing Billet Interior Parts
- Safety Precautions and Prep Work
- Removing Factory Interior Components
- Step-by-Step Installation Process for Billet Interior Parts
- Compatibility Matrix: OBS and NBS Chevy and GMC Fitment
- Troubleshooting Common Fitment Issues
- How to Maintain Billet Aluminum Interior Parts
- Conclusion
Last Updated: August 18, 2026
If you've ever searched a forum for straight answers on installing billet interior parts, you know the problem: information is scattered, photos are broken, and nobody agrees on which tool to use first. This guide from LG Billet USA fixes that. Below is a complete, sequenced walkthrough covering everything from tools to fitment quirks that catch first-timers off guard. Whether you're installing CNC-machined dash vents or swapping every plastic trim piece in the cab, the process is the same: preparation beats improvisation.

Billet interior parts are precision-machined aluminum components that replace factory plastic trim with a higher-grade, longer-lasting alternative. Done right, the installation is clean, reversible, and takes an afternoon. Done wrong, you're left with rattling panels, scratched surfaces, and hardware that won't seat.
Most guides skip prep work and jump straight to installation. The next section covers exactly what you need before touching the first panel.
What You'll Need Before Installing Billet Interior Parts
Good installs start with good prep. Gathering the right tools prevents the most common frustration: stopping mid-job because you're missing something.
Best Tools for Automotive Interior Trim Removal
The best tools protect factory surfaces while releasing clips and rods without breaking them. A basic kit includes:
- Plastic pry tools (trim removal set): Non-marring and essential. A set of 5-8 pieces covers most panel geometries.
- Panel clip removal tool: Specifically shaped to pop retaining clips without snapping them.
- T10, T15, T20 Torx drivers: Many OBS and NBS trucks use Torx fasteners behind panels and at door handle bezels.
- Phillips #2 and flathead screwdrivers: For retaining screws on glove box buttons and dash trim.
- Trim removal hook: Useful for fishing rod clips in tight spaces.
- Microfiber cloths: Protect painted surfaces during removal.
- Masking tape: Tape off adjacent painted surfaces before prying near door jambs or the A-pillar.
A cordless drill with low-torque setting is useful for rivnuts or drilling fastener holes, though most bolt-on billet upgrades don't require one.
Tool Alternatives When You Don't Have the Ideal Kit
A wide flathead screwdriver wrapped in masking tape works as a pry tool in a pinch, though it requires more care. A butter knife wrapped in electrical tape substitutes for a trim hook when fishing rod clips. For Torx fasteners, a multi-bit screwdriver set covers common sizes. Purpose-built plastic pry tools give better control, so if doing a full interior upgrade, a basic trim removal kit is worth the investment.
Safety Precautions and Prep Work
Safety in automotive interior work protects the vehicle and yourself from sharp edges. Billet aluminum parts have machined edges that can be sharp before installation. Handle them with work gloves during dry-fitting.
Disconnect the negative battery terminal before working near door panel wiring or dash electrical components. This is especially relevant on trucks with power windows, power mirrors, or aftermarket audio wiring. As noted in OSHA's electrical safety guidelines for automotive work, disconnecting power before handling wiring near trim panels is standard precaution.
Additional prep steps save time:
- Photograph the factory interior before disassembly for quick reference.
- Lay out a clean moving blanket on the seat to set removed panels without scratching them.
- Keep a small parts tray for retaining screws and panel clips to prevent losing them mid-install.
Removing Factory Interior Components
Removing factory interior components correctly separates a clean billet install from one that leaves scratches and broken clips. Always remove fasteners before prying, and always pry at clip locations.
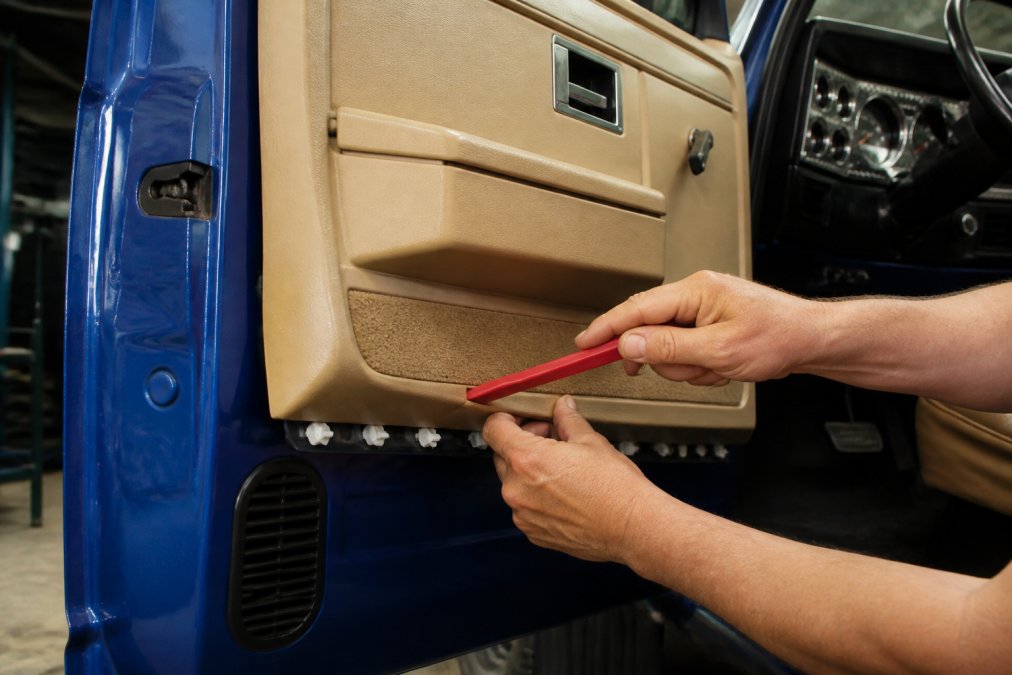
Start with the door panels. On most OBS and NBS Chevy and GMC trucks, the sequence runs:
- Remove the manual window crank using a window crank removal tool or a folded rag to pop the retaining clip.
- Remove the door handle trim cup screws, typically one or two Phillips fasteners recessed inside the cup.
- Remove the armrest screws, usually located underneath the armrest pad.
- Pop the door panel clips along the perimeter using a panel clip removal tool, working from the bottom edge upward.
- Lift the panel upward to release it from the window channel retainer at the top.
Handling Door Panel Clips and Rods
Door panel clips and rods are where most installs fail. OBS trucks from 1988-1998 use plastic push-in clips and metal rod clips connecting the door latch and lock rod to the door handle assembly. Before pulling a door panel free, confirm all rod clips are disconnected. Pulling the panel with a rod still attached bends the rod or snaps the clip retainer.
To release a rod clip, use a trim removal hook to depress the retaining tab while sliding the rod out laterally. Mark each rod with tape labeled "latch" or "lock" before removal, as rods are not always the same length.
Step-by-Step Installation Process for Billet Interior Parts
Installing billet interior parts follows a straightforward sequence: dry-fit first, confirm alignment, then fasten. Rushing past the dry-fit step causes misaligned bezels and stripped fastener holes.
Billet Interior Door Handle Installation
Billet interior door handle installation replaces the factory plastic door handle bezel and, in some kits, the handle itself with a CNC-machined aluminum unit:
- With the door panel removed, locate the factory door handle assembly and remove the retaining screws holding the bezel to the panel.
- Slide the factory handle out from the trim cup opening.
- Test-fit the billet door handle assembly into the opening. Confirm that the rod attachment points align with existing rod clip positions.
- Connect the latch rod and lock rod to the billet handle using the original rod clips or replacement clips included in the hardware kit.
- Fasten the billet bezel using the provided fasteners. Do not overtighten; billet aluminum threads strip more easily than plastic if torqued past hand-tight plus a quarter turn.
- Reinstall the door panel in reverse sequence, pressing each clip firmly until it seats with an audible click.
A properly installed billet door handle sits flush with the door panel with no flex or rattle when operated.
Dash Panel and Vent Bezel Installation
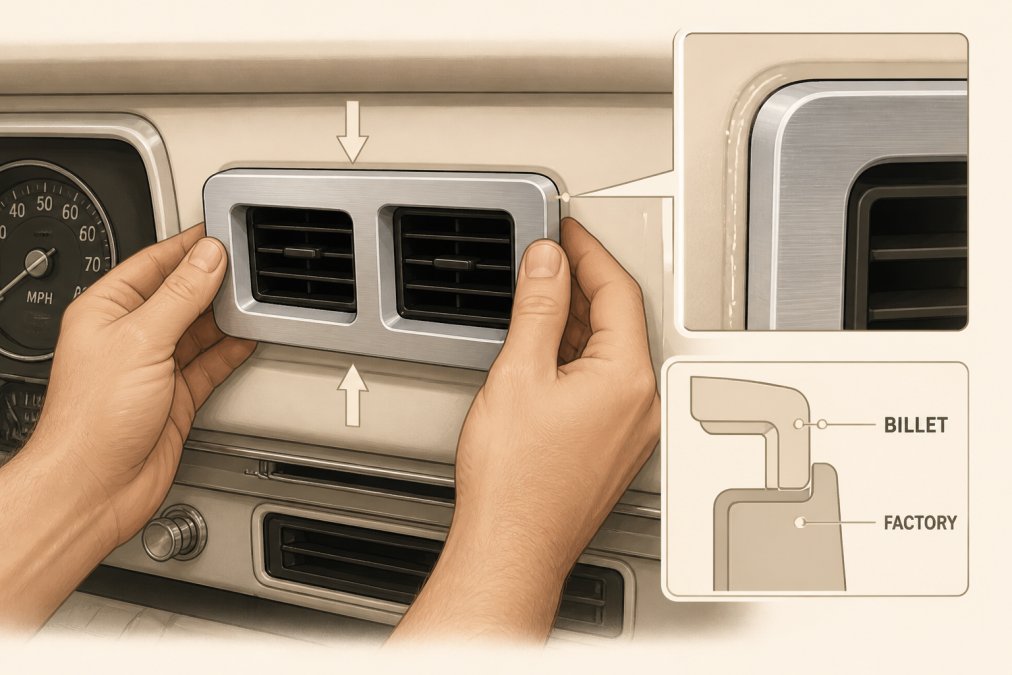
Dash panel and vent bezel installation has the most visual impact. On OBS Chevy and GMC trucks, dash vents are held by retaining clips and friction fit. On NBS trucks, additional retaining screws are common.

For the LG Billet USA Spare Time Billet OBS Dash Vents (1988-1994 trucks) and the 1995-1998 OBS Dash Vents, installation follows this sequence:
- Remove the factory vent by inserting a plastic pry tool at the vent's outer edge and applying gentle outward pressure while depressing the retaining clip.
- Disconnect any HVAC ducting attached to the back of the vent.
- Dry-fit the billet vent into the opening. The precision fit should drop in with minimal resistance and sit flush with the dash panel surface.
- Reconnect the HVAC ducting to the billet vent's outlet port.
- Press the vent firmly inward until the retaining clips engage.
For the Under Dash Kit (1988-1994 trucks), installation uses 3M double-sided tape. Clean the mounting surface with isopropyl alcohol, allow it to dry completely, then press the billet piece firmly into position for 60 seconds. The adhesive reaches full strength after 24 hours.

Compatibility Matrix: OBS and NBS Chevy and GMC Fitment
Fitment is where most online billet interior purchases go wrong. The OBS Chevy and GMC C/K trucks span 1988-1998, but the dash changed significantly between 1988-1994 and 1995-1998, which is why LG Billet USA dash vent sets are offered as separate SKUs for each range.
| Year Range | Body Style | Dash Configuration | Compatible Parts |
|---|---|---|---|
| 1988-1994 | OBS C/K | Square dash, 4-vent layout | 88-94 Dash Vents, Under Dash Kit |
| 1995-1998 | OBS C/K | Revised dash, updated vent positions | 95-98 Dash Vents, Dash Saver (95-96) |
| 1999-2006 | NBS C/K (GMT800) | Completely redesigned cab | NBS-specific hardware kits |
The most common fitment mistake is ordering 1988-1994 parts for a 1995 or 1996 truck. The vent openings are dimensionally different. Always confirm your model year before ordering.
The NHTSA VIN decoder reliably confirms your exact model year if the door jamb sticker is worn or missing.
If doing a full frame-off restoration, match finish (polished, brushed, or black anodized) across every billet piece for a cohesive look. If upgrading a daily driver incrementally, prioritize pieces with the most visual impact: dash vents and door handles are what occupants see and touch every day.
Troubleshooting Common Fitment Issues
Most fitment issues fall into three categories: the part won't seat flush, a fastener hole doesn't align, or there's a gap between the billet piece and factory trim.
Part won't seat flush: This almost always means a factory clip or retaining tab wasn't fully removed. Remove the billet piece, inspect the opening for remaining plastic tabs, and trim them flush if necessary.
Fastener hole misalignment: On bolt-on hardware kits, a 1-2mm misalignment prevents a fastener from threading. Loosen any already-fastened points, shift the piece slightly, and re-attempt. Never force a fastener into a misaligned hole. As noted in the Society of Automotive Engineers' fastener torque guidelines, cross-threading aluminum fasteners is a permanent failure requiring re-tapping or replacement.
Gap between billet piece and factory trim: This typically indicates a generation mismatch. Reconfirm your model year against the fitment chart above. A gap running consistently along one edge usually means a factory clip is preventing full seating.
CNC-machined components are dimensionally precise. If it doesn't fit cleanly, the issue is either the wrong part or an obstruction, not insufficient force.
How to Maintain Billet Aluminum Interior Parts
Billet aluminum interior parts require less maintenance than factory plastic but aren't maintenance-free. The finish type determines the care approach.
| Finish | Cleaning Method | Frequency | Avoid |
|---|---|---|---|
| Polished | Aluminum polish, microfiber | Monthly | Abrasive pads, harsh solvents |
| Brushed | Mild soap and water, grain-direction wipe | As needed | Cross-grain scrubbing |
| Black Anodized | Mild soap and water | As needed | Acidic cleaners, abrasive compounds |
For polished billet, quality aluminum polish applied with a microfiber cloth keeps the surface bright and prevents oxidation. For brushed aluminum, always wipe in the direction of the grain. Black anodized pieces are the most durable and lowest maintenance, resistant to most interior chemicals.
A light coat of automotive interior protectant applied to surrounding factory trim after installation keeps the contrast between billet pieces and factory panels looking intentional.
For long-term preservation, the Aluminum Association's care and maintenance guide provides detailed guidance on protecting machined aluminum surfaces in high-contact environments.
Keeping factory plastic interior trim on a truck you've invested real effort into is a small frustration that adds up over time. LG Billet USA offers CNC-machined billet interior parts built specifically for OBS and NBS Chevy and GMC trucks, with direct-fit precision that eliminates guesswork on installation. The dash vents, under-dash kits, and door hardware bolt in without modification. Get started with LG Billet USA and replace the last plastic piece in your cab with something that actually belongs there.
Frequently Asked Questions
What tools are needed to install billet interior door handles?
You'll need a set of plastic pry tools to remove the door panel without scratching surrounding trim, a Phillips and flathead screwdriver, a trim clip remover, and needle-nose pliers for disconnecting the rod clip from the door handle assembly. Some installations also require a small socket set for retaining screws. Having a clean, padded work surface nearby protects the CNC-machined finish on your new billet parts during the swap.
Do I need to remove the door panel to install billet interior parts?
For door handle and interior trim cup replacements, yes, door panel removal is required. You'll need to release the panel clips along the bottom and sides, disconnect any window switch harnesses, and carefully lift the panel off the door. Dash panel upgrades like billet dash vents or a dash saver kit typically don't require door panel removal and can be accessed directly from the cab with basic hand tools.
Are billet interior parts compatible with all truck models?
No, fitment is year- and model-specific. For example, OBS Chevy and GMC dash vent sets are split between 1988-1994 and 1995-1998 generations because the dash panel design changed between those years. Always verify the exact model year before ordering. LG Billet USA lists compatible years on every product page, so cross-check your truck's year against the fitment details to confirm a precision fit before purchasing.
How do I prevent scratching billet aluminum during installation?
Work on a padded surface and keep plastic pry tools between metal fasteners and the billet finish at all times. Avoid steel tools making direct contact with the machined aluminum surface. When pressing bezels or trim pieces into place, use a clean microfiber cloth between your palm and the part. After installation, avoid abrasive cleaners, a pH-neutral soap and a soft cloth are all you need to maintain the finish quality long-term.
This article was written using GrandRanker